6.4 Diffusion from Scratch
Understanding Stable Diffusion from "Scratch"
Created Date: 2025-06-15
In this tutorial , we walked through all the building blocks of Stable Diffusion, including:
Principle of Diffusion models.
Model score function of images with UNet model.
Understanding prompt through contextualized word embedding.
Let text influence image through cross attention.
Improve efficiency by adding an autoencoder.
Large scale training.
6.4.1 Playing with Stable Diffusion
It has many sections with loose order between them. You can:
Play with generating art from prompt.
See the effect of the parameters for generating process.
Visualizing the diffusion process and latents.
Looking under the hood of the sampling function.
Inspect the internal network architecture of the components of Stable Diffusion.
6.4.1.1 Loading Stable Diffusion
To run the code below, you need to install the diffusers library. You can do this by running:
pip install diffusers
import os
import numpy
import torch
import torch
from diffusers import StableDiffusionPipeline
from matplotlib import pyplot
Make sure you have a GPU available, as Stable Diffusion requires significant computational resources. You can check if CUDA is available with:
assert torch.cuda.is_available(), "CUDA is not available. Please run on a machine with a GPU."Now, file loading_diffusion.py load the Stable Diffusion model. You will need to authenticate with the Hugging Face Hub to access the model weights. If you don't have an account, you can create one at Hugging Face .
Here fp16 checkpoint is loaded just to save memory and compute time. if you have a great gpu, you can remove the line revision="fp16", torch_dtype=torch.float16 :
pipe = StableDiffusionPipeline.from_pretrained(
    "CompVis/stable-diffusion-v1-4",
    revision="fp16",
    torch_dtype=torch.float16,
    use_auth_token=True
).to("cuda")

# Disable the safety checker for this example
def dummy_checker(images, **kwargs):
    return images, [False] * len(images)
pipe.safety_checker = dummy_checker
6.4.1.2 Generative Playground
Once the model is loaded, you can generate images from text prompts. The following code generates an image of a "lovely cat running in the desert in Van Gogh style, trending art." and displays it.
Generating an Image
prompt = "a lovely cat running in the desert in Van Gogh style, trending art."
image = pipe(prompt).images[0]  # image here is in [PIL format](https://pillow.readthedocs.io/en/stable/)

# Now to display an image you can do either save it such as
os.makedirs("temp", exist_ok=True)
image.save(f"temp/lovely_cat.png")

pyplot.imshow(numpy.array(image))  # Convert PIL image to numpy array for display
pyplot.axis('off')  # Hide axes
pyplot.show()  # Display the image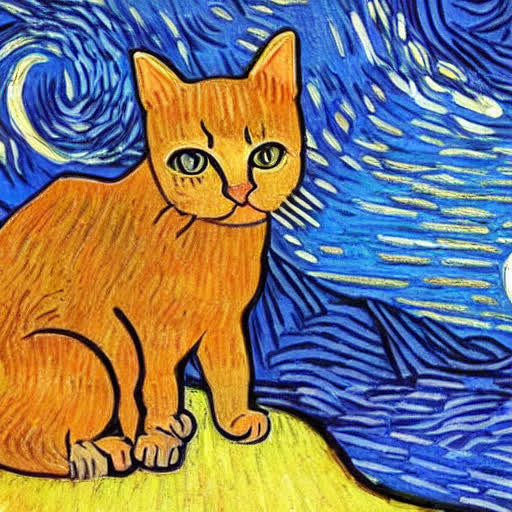
Figure 1 - A Lovely Cat Generated by Stable Diffusion
Fixing the Random Seed
By creating a torch.Generator object and setting its seed with .manual_seed(42) , you ensure that the same sequence of random numbers is used each time the pipeline is run with this generator. This results in the same image being generated from the same prompt and other parameters:
generator = torch.Generator("cuda").manual_seed(42)
prompt = 'a sleeping cat enjoying the sunshine.'
image = pipe(prompt, generator=generator).images[0]  # Generate image with a fixed seed
image.save(f"temp/sleeping_cat_seed.png")
pyplot.imshow(numpy.array(image))  # Convert PIL image to numpy array for display
pyplot.axis('off')  # Hide axes
pyplot.show()  # Display the image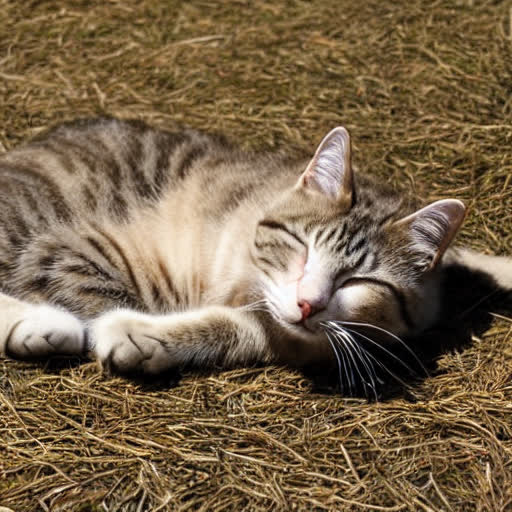
Figure 2 - A Sleeping Cat with Fixed Seed
Changing (Denoising) Diffusion Steps
To generate images with different levels of detail, you can adjust the num_inference_steps parameter. This parameter controls how many steps the diffusion model takes to generate the image. More steps generally lead to higher quality images but take longer to compute:
prompt = 'a sleeping cat enjoing the sunshine.'
image = pipe(prompt, num_inference_steps=25).images[0]
image.save(f"temp/sleeping_cat_25.png")
pyplot.imshow(numpy.array(image))  # Convert PIL image to numpy array for display
pyplot.axis('off')  # Hide axes
pyplot.show()  # Display the image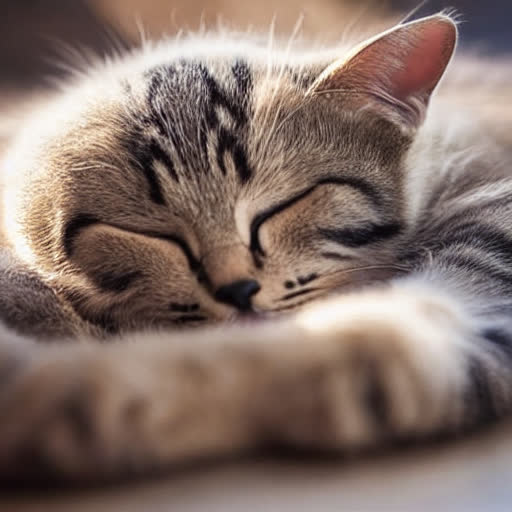
Figure 3 - A Sleeping Cat with 25 Inference Steps
Adding Negative prompt
Adding negative prompt can control what you do not want.
prompt = "a sleeping cat enjoying the sunshine."
image = pipe(prompt, negative_prompt="tree and leaves").images[0]
image.save(f"temp/sleeping_cat_negative.png")
pyplot.imshow(numpy.array(image))
pyplot.axis("off")
pyplot.show()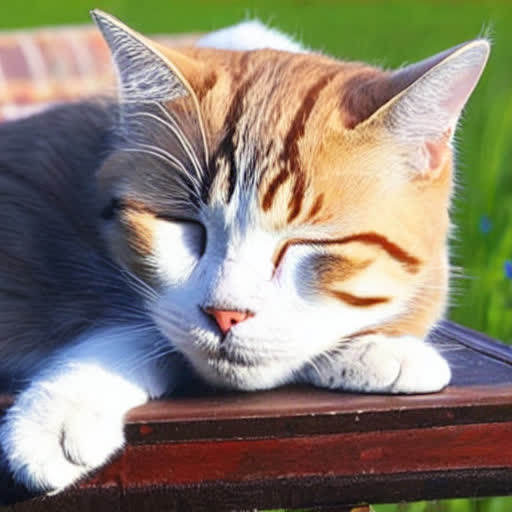
Figure 4 - A Sleeping Cat with Negative Prompt
6.4.1.3 Visualizing the Diffusion in Action
To visualize the diffusion process, you can use a callback function that saves intermediate images at each step of the diffusion process. File diffusion_visualize.py is an example of how to implement such a callback function and use it during the image generation process:
image_reservoir = []
latents_reservoir = []


@torch.no_grad()
def saveimg_callback(pipe, step_index, timestep, callback_kwargs, frequency=10):
    # You can get the latents from the kwargs
    latents = callback_kwargs["latents"]

    # Add your existing logic here, perhaps with a frequency check
    if step_index % frequency == 0:
        # Example of how to access and save the image
        image = pipe.vae.decode(1 / 0.18215 * latents).sample
        image = (image / 2 + 0.5).clamp(0, 1)
        image_np = image.cpu().permute(0, 2, 3, 1).float().numpy()[0]
        pil_image = pipe.numpy_to_pil(image_np)[0]
        pil_image.save(f"temp/diffprocess/step_{step_index:04d}_{timestep}.png")
        image_reservoir.append(image_np)
        latents_reservoir.append(latents.detach().cpu())
    # Important: The function must return the callback_kwargs
    return callback_kwargs
Now, you can use this callback function during the image generation process. The following code generates an image while saving intermediate steps:
image_reservoir = []
latents_reservoir = []
prompt = "a lovely cat running in the desert in Van Gogh style, trending art."
with torch.no_grad():
    image = pipe(
        prompt,
        callback_on_step_end=functools.partial(saveimg_callback, frequency=1),
        callback_on_step_end_tensor_inputs=["latents"],
    ).images[0]
image.save(f"temp/lovely_cat_vangogh.png")
mediapy.write_video("temp/lavely_cat_vangopy.mp4", image_reservoir, fps=10)
print("Lantents shape:", latents_reservoir[0].shape)
latents_np_seq = [
    tsr[0, [0, 1, 2]].permute(1, 2, 0).numpy() for tsr in latents_reservoir
]
mediapy.write_video("temp/latents_seq.mp4", latents_np_seq, fps=10)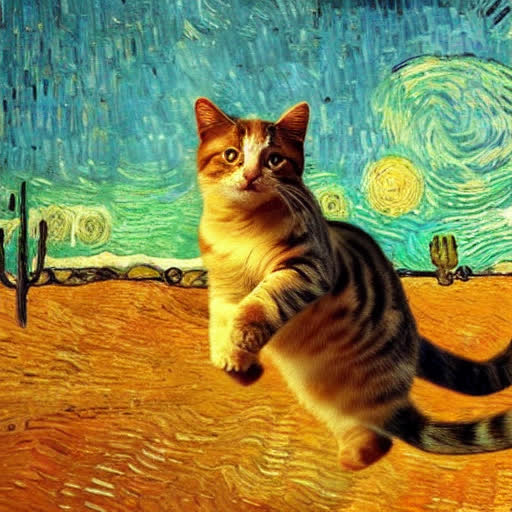
Figure 5 - A Lovely Cat in Van Gogh Style
Lantents shape: torch.Size([1, 4, 64, 64])
6.4.1.4 Write a Simple text2img Sampling Function
File pipe_simplified.py provide a simplified version of the sampling function! See what happened under the hood when you run pipe(prompt) we define a pipe_simplified function. Feel free to print out tensors and record their shape within this function!
def pipe_simplified(
    prompt=["a lovely cat"],
    negative_prompt=[""],
    # `num_inference_steps` is the number of denoising steps. More denoising steps usually lead to a higher quality image at the expense of slower inference.
    # It is recommended to use between 50 and 150 denoising steps, with 50 being a good default.
    num_inference_steps=50,
    # here `guidance_scale` is defined analog to the guidance weight `w` of equation (2)
    # of the Imagen paper: https://arxiv.org/pdf/2205.11487.pdf . `guidance_scale = 1`
    # corresponds to doing no classifier free guidance.
    # Higher guidance scale encourages to generate images closely linked to the text `prompt`,
    # usually at the expense of lower image quality.
    # Guidance scale of 7.5 is a good default value.
    # Guidance scale of 1.0 is equivalent to doing no classifier free guidance.
    guidance_scale=7.5,
):
The following code snippet shows how to get the text embeddings from the prompt using the tokenizer and text encoder of the Stable Diffusion pipeline:
# get prompt text embeddings
text_inputs = pipe.tokenizer(
    prompt,
    padding="max_length",
    max_length=pipe.tokenizer.model_max_length,
    return_tensors="pt",
)
text_input_ids = text_inputs.input_ids
text_embeddings = pipe.text_encoder(text_input_ids.to(pipe.device))[0]
bs_embed, seq_len, _ = text_embeddings.shape
print(f"Text embeddings shape: {text_embeddings.shape}")
Text embeddings shape: torch.Size([1, 77, 768])
# get negative prompts  text embedding
max_length = text_input_ids.shape[-1]
uncond_input = pipe.tokenizer(
    negative_prompt,
    padding="max_length",
    max_length=max_length,
    truncation=True,
    return_tensors="pt",
)
uncond_embeddings = pipe.text_encoder(uncond_input.input_ids.to(pipe.device))[0]
print(f"Unconditional text embeddings shape: {uncond_embeddings.shape}")
Unconditional text embeddings shape: torch.Size([1, 77, 768])
For classifier free guidance, we need to do two forward passes. Here we concatenate the unconditional and text embeddings into a single batch to avoid doing two forward passes:
# duplicate unconditional embeddings for each generation per prompt, using mps friendly method
seq_len = uncond_embeddings.shape[1]
uncond_embeddings = uncond_embeddings.repeat(batch_size, 1, 1)
uncond_embeddings = uncond_embeddings.view(batch_size, seq_len, -1)

text_embeddings = torch.cat([uncond_embeddings, text_embeddings])
print(f"Concatenated text embeddings shape: {text_embeddings.shape}")
Unlike in other pipelines, latents need to be generated in the target device for 1-to-1 results reproducibility with the CompVis implementation:
latents_shape = (batch_size, pipe.unet.in_channels, height // 8, width // 8)
latents_dtype = text_embeddings.dtype
latents = torch.randn(
    latents_shape, generator=generator, device=pipe.device, dtype=latents_dtype
)
Now we can scale the initial noise by the standard deviation required by the scheduler. This is important for the diffusion process to work correctly:
# set timesteps
pipe.scheduler.set_timesteps(num_inference_steps)
# Some schedulers like PNDM have timesteps as arrays
# It's more optimized to move all timesteps to correct device beforehand
timesteps_tensor = pipe.scheduler.timesteps.to(pipe.device)
# scale the initial noise by the standard deviation required by the scheduler
latents = latents * pipe.scheduler.init_noise_sigma
Finally, we can run the main diffusion process. The following code iterates over the timesteps and performs the denoising steps:
# Main diffusion process
for i, t in enumerate(pipe.progress_bar(timesteps_tensor)):
    # expand the latents if we are doing classifier free guidance
    latent_model_input = torch.cat([latents] * 2)
    latent_model_input = pipe.scheduler.scale_model_input(latent_model_input, t)
    # predict the noise residual
    noise_pred = pipe.unet(
        latent_model_input, t, encoder_hidden_states=text_embeddings
    ).sample
    # perform guidance
    noise_pred_uncond, noise_pred_text = noise_pred.chunk(2)
    noise_pred = noise_pred_uncond + guidance_scale * (
        noise_pred_text - noise_pred_uncond
    )
    # compute the previous noisy sample x_t -> x_t-1
    latents = pipe.scheduler.step(
        noise_pred,
        t,
        latents,
    ).prev_sample

latents = 1 / 0.18215 * latents
image = pipe.vae.decode(latents).sample
image = (image / 2 + 0.5).clamp(0, 1)
# we always cast to float32 as this does not cause significant overhead and is compatible with bfloa16
image = image.detect().cpu().permute(0, 2, 3, 1).float().numpy()
return image
We need GPU over 8 GB, otherwise you will get the error like below:
RuntimeError: CUDA error: out of memory
CUDA kernel errors might be asynchronously reported at some other API call, so the stacktrace below might be incorrect.
image = pipe_simplified(
prompt=["a lovely cat"],
negative_prompt=["Sunshine"],
)
# The two lines below are the problem. Remove them.
image = pipe.numpy_to_pil(image)[0]
image.save(f"temp/lovely_cat_simplified.png")
pyplot.imshow(numpy.array(image))
pyplot.axis("off")
pyplot.show()
Figure 6 - A Lovely Cat Generated by Simplified Sampling Function
image = pipe_simplified(
    prompt = ["a cat dressed like a ballerina"],
    negative_prompt = [""],)
# The two lines below are the problem. Remove them.
image = pipe.numpy_to_pil(image)[0]
image.save(f"temp/dressed_car_simplified.png")
pyplot.imshow(numpy.array(image))
pyplot.axis("off")
pyplot.show()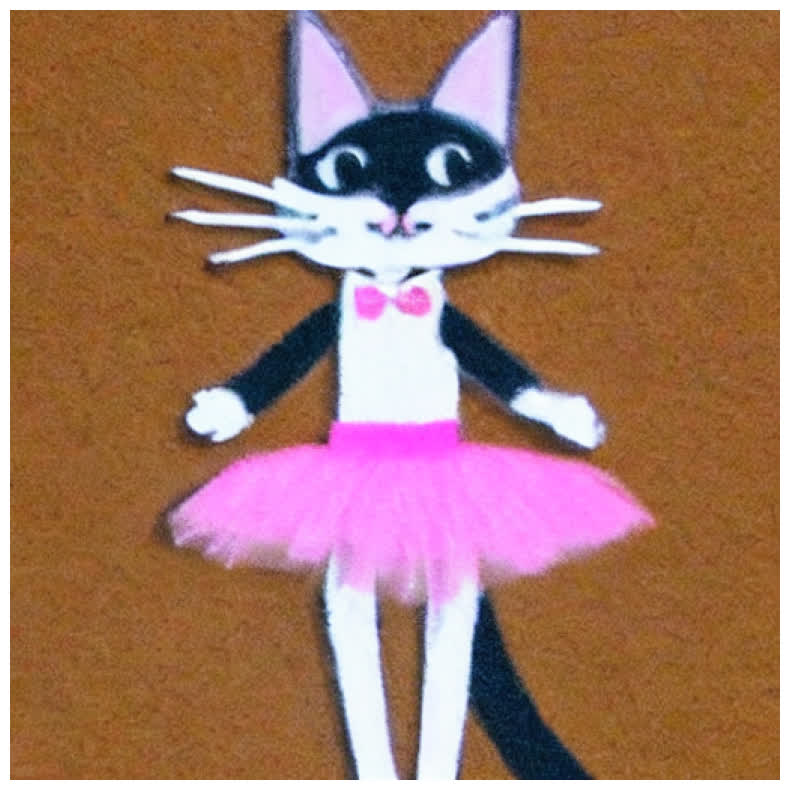
Figure 7 - A Dressed Cat Generated by Simplified Sampling Function
6.4.1.5 Image to Image Translation Playground
Stable Diffusion also supports image-to-image translation, where you can provide an initial image and a prompt to guide the generation process. This is useful for tasks like style transfer or enhancing existing images.
model_path = "CompVis/stable-diffusion-v1-4"
device = "cuda" if torch.cuda.is_available() else "cpu"

pipe = StableDiffusionImg2ImgPipeline.from_pretrained(
    model_path, revision="fp16", torch_dtype=torch.float16, use_auth_token=True
)
pipe = pipe.to(device)
To use the image-to-image functionality, you need to provide an initial image. The following code fetches an image from a URL, resizes it, and saves it locally:
os.makedirs("temp", exist_ok=True)
response = requests.get(url)
init_img = Image.open(BytesIO(response.content)).convert("RGB")
init_img = init_img.resize((768, 512))
init_img.save("temp/sketch-mountains-input.jpg")
pyplot.imshow(init_img)
pyplot.axis("off")
pyplot.show()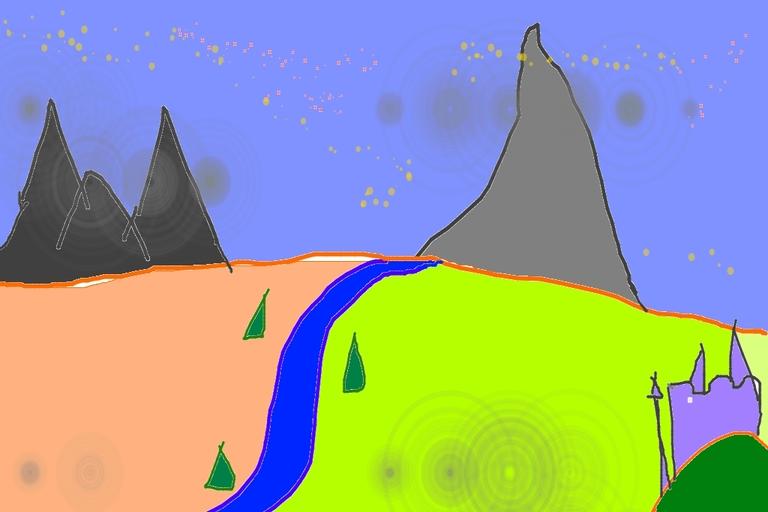
Figure 8 - Sketch Mountains Input
Now, you can use the image-to-image pipeline to generate a new image based on the initial image and a text prompt. The strength parameter controls how much the initial image influences the final output. A value of 0 means the output is entirely based on the prompt, while a value of 1 means the output is entirely based on the initial image.
prompt = "A fantasy landscape, trending on artstation"
generator = torch.Generator(device=device).manual_seed(1024)
image = pipe(
    prompt=prompt,
    image=init_img,
    strength=0.75,
    num_inference_steps=50,
    guidance_scale=7.5,
    generator=generator,
).images[0]

image.save("temp/fantasy_landscape.png")
pyplot.imshow(image)
pyplot.axis("off")
pyplot.show()
Figure 9 - Fantasy Landscape Output
6.4.1.6 Write a Simple img2img Sampling Function
6.4.1.7 The Internal Structure of Model
6.4.2 Build Stable Diffusion U-Net Model
In previous section, we went over the various components necessary to make an effective diffusion generative model like Stable Diffusion.
As a reminder, they are:
Method of learning to generate new stuff (forward/reverse diffusion);
Way to link text and images (text-image representation model like CLIP);
Way to compress images (autoencoder);
Way to add in good inductive biases (U-net architecture + self/cross-attention);
In this section, you will implement pieces of each of the above, and by the end have a working Stable-Diffusion-like model.
In particular, you will implement parts of:
Basic 1D forward/reverse diffusion;
A U-Net Architecture for Working with Images;
The Loss Associated with Learning the Score Function;
An Attention Model for Conditional Generation;
An Autoencoder